Introduction
Many homeowners and contractors underestimate what separates a retaining wall that lasts decades from one that fails within a few seasons. A retaining wall holds back soil and manages grade changes — the outcome depends on a compacted base, proper batter, and drainage done right.
If you're tackling slopes, erosion, or terracing, walls under 3–4 feet are typically DIY-friendly. Taller structures involve engineering considerations and may require permits.
According to industry data, 60% of retaining wall failures trace back to water-related issues — making drainage the most critical, and most overlooked, step in the build. This guide covers everything from pre-build planning to the final cap.
TLDR
- Base course and gravel foundation do more work than any block above — get these right first
- Call 811 before digging (legally required in Wisconsin at least 3 days prior)
- Pack 12–18 inches of crushed stone behind the wall — poor drainage is the #1 cause of retaining wall failure
- Interlocking concrete blocks suit most residential walls — no mortar needed, easy to adjust on-site
- Walls over 3–4 feet need geogrid reinforcement, permits, or professional review
What to Know Before You Start Building
Local Codes and Permits
Building codes vary significantly across southeastern Wisconsin. While the International Building Code generally exempts walls under 4 feet, Milwaukee requires a permit for walls supporting more than 32 inches of unbalanced fill, whereas nearby Waukesha allows up to 4 feet. Always verify requirements with your local building department before breaking ground.
Call 811 — It's the Law
Wisconsin Statute 182.0175 legally requires contacting Diggers Hotline at least 3 working days before any excavation. This free service marks underground utilities and prevents dangerous, costly strikes. Skipping it is illegal and carries serious penalties.
How Wall Height Affects Design
Wall height determines structural requirements:
- Under 3 feet: Use gravity walls that rely on block weight and setback
- 3–4 feet and taller: Require geogrid reinforcement or engineered footings to handle lateral soil pressure
- Over 4 feet: Require professional engineering and permits in most jurisdictions
Once you've confirmed height requirements, a quick site assessment will shape the rest of your design decisions.
Site Assessment Checklist
Before designing your wall, evaluate:
- Slope gradient above the wall — steeper grades mean more soil pressure to manage
- Drainage patterns during heavy rain, since poor runoff accelerates wall failure
- Soil type — clay retains water and pushes harder against a wall than sandy or granular soils
- Loads above the wall — driveways, structures, or heavy foot traffic significantly increase lateral pressure
Choosing the Right Retaining Wall Material
Material Comparison
| Material | Lifespan | DIY Difficulty | Best For |
|---|---|---|---|
| Interlocking Concrete Block | 75–100 years | Moderate | Most residential projects under 4 feet |
| Natural Stone | 40–100+ years | High | Low gravity walls, aesthetic projects |
| Timber/Railroad Ties | 10–20 years | Low | Temporary or budget projects |
| Poured Concrete/CMU | 50–100 years | High | Engineered, load-bearing structures |

Why Interlocking Concrete Block Wins
Interlocking concrete block systems are the most popular choice for residential walls: they're designed for consistent setback and stacking, require no mortar, and are built for DIY installation. If you're sourcing materials in the Milwaukee area, The Brickyard stocks a wide selection of retaining wall block and natural stone products, and their staff can help estimate quantities and match materials to your specific project.
Don't Use Decorative Edging Blocks for Retention
Decorative garden edging blocks lack the mass and ASTM C1372 certification required for earth retention. Manufacturers explicitly warn against using landscape edging for structural applications. Always verify blocks are rated for retaining wall use.
How to Build a Retaining Wall: Step by Step
Step 1: Mark the Layout
Use landscape stakes and mason's line to outline the wall's footprint. Double-check measurements and confirm the line is straight or curves as intended before digging.
Step 2: Excavate the Base Trench
Dig a trench deep enough to bury the first course by approximately half its height, typically 6 inches, plus an additional 6 inches for the gravel base — roughly 12 inches total. Widen the trench to allow working room behind the wall for backfill.
For sloped ground: Step the base trench rather than angling it. Each step should be level and one full block height tall to maintain consistent foundation across the entire wall length.
Step 3: Lay and Compact the Gravel Base
Add 6 inches of ¾-inch crushed stone to the trench in 2-inch lifts, compacting each layer with a hand tamper or plate compactor before adding the next. This base prevents settling and provides drainage beneath the wall.
Critical: Check for level across the entire base before placing any block. Unevenness at this stage multiplies across every course stacked above it.
Step 4: Set the Base Course
Place the first course directly on compacted gravel, checking for level both front-to-back and side-to-side with each block. The base course should sit slightly below finished grade so it appears buried. This anchors the wall and prevents the bottom course from kicking outward.
For blocks with a rear lip, the base course typically uses a lip-free block (or the lip is chipped off) so the block sits flat on gravel. Always verify with the manufacturer's installation instructions.
Step 5: Stack Subsequent Courses
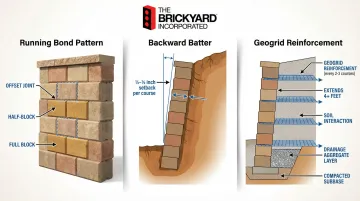
As you build up, three techniques keep the wall structurally sound:
- Running bond: Start every other course with a half block to stagger vertical joints. This ties courses together and eliminates weak seams running the full height.
- Backward batter: Pull each course back ¼ to ½ inch (varies by block design) so the wall leans slightly into the hillside. The angle uses the wall's own weight to resist soil pressure.
- Geogrid reinforcement (walls over 3–4 feet): Lay geogrid flat on the block surface every 2–3 courses, extending it back at least 60% of the total wall height into compacted backfill — never less than 4 feet. This anchors the wall against overturning.
Step 6: Cap and Finish
Apply the final cap course using construction adhesive rated for masonry to prevent top blocks from shifting or being dislodged. Caps give the wall a clean, finished appearance and protect the top edge from weathering.
Backfill behind the wall with compacted soil in lifts once drainage aggregate and landscape fabric are in place. Finish the surface above the wall with topsoil, sod, or plantings.
Why Drainage Makes or Breaks a Retaining Wall
The Core Problem: Hydrostatic Pressure
Soil behind a retaining wall absorbs water, which increases soil weight and lateral pressure dramatically. Without drainage, this hydrostatic pressure will push, crack, or topple even a well-built wall over time. Industry research shows that 60% of retaining wall failures stem from water-related issues.
Standard Drainage Assembly
Required components:
- Landscape fabric placed against the back of the wall before backfilling to keep fine soil particles from clogging the gravel
- 12–18 inches of clean ¾-inch crushed stone (not pea gravel) directly behind the wall
- A 4-inch perforated pipe wrapped in filter fabric at the wall base — required for walls over 2–3 feet tall, clay-heavy soils, or high-runoff sites
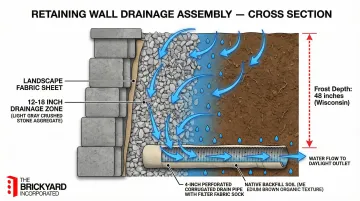
The drain pipe must maintain a minimum 1% gradient and vent to daylight or a storm sewer every 50 feet.
Wisconsin Freeze-Thaw Considerations
In Wisconsin, where frost depth exceeds 18 inches, trapped water behind a wall will freeze and expand. This frost heave exerts massive lateral pressure that can blow out wall faces. Keeping the drainage zone dry through winter is what prevents that kind of failure.
Do 2-Foot Walls Need Drainage?
Yes. The risk of hydrostatic pressure is lower at this height, but heavy rainfall, clay soil, and freeze-thaw cycles can still cause problems. Gravel backfill is a low-cost safeguard worth including regardless of wall height.
Common Retaining Wall Mistakes to Avoid
Most retaining wall failures trace back to a handful of avoidable errors. Here's what to watch for before you start stacking.
Skipping or Skimping on the Base
The most common DIY error is laying block directly on soil or using too thin a gravel base. Without a properly compacted 6-inch gravel base, the wall will settle unevenly and lean within one or two seasons.
Poor Drainage or No Drainage
Relying on soil to drain naturally behind the wall or omitting gravel backfill is the leading cause of wall bulging, leaning, and collapse. With 60% of retaining wall failures tied to water issues, drainage is non-negotiable.
Ignoring Setback (Batter)
Building courses straight up rather than stepping them back into the slope removes one of the wall's primary structural mechanisms. Even a small setback per course adds measurable stability over the full wall height — the difference between a wall that holds for decades and one that leans by year three.
Not Staggering Block Joints
Vertical seams that run the full height of the wall create structural weak points. Always use a running bond pattern, starting every other course with a half block. Skipping this step is one of the fastest ways to undermine an otherwise well-built wall.
Frequently Asked Questions
Should you put gravel behind a retaining wall?
Yes, gravel backfill is essential for drainage. Place 12–18 inches of crushed stone directly behind the wall to allow water to drain down and away rather than building up hydrostatic pressure that can push the wall outward.
Does a 2-foot retaining wall need drainage?
While a 2-foot wall carries lower risk, drainage is still recommended — particularly in clay soils or freeze-thaw climates like Wisconsin. Even modest water pressure accelerates wall movement and deterioration over time.
Does a 2-foot retaining wall need a footing?
A poured concrete footing is not required for low block walls, but the base course should be buried in a 6-inch compacted gravel base that acts as a stable footing. Skipping this step is a leading cause of settling and leaning.
How much does it cost to build a 2-foot retaining wall?
A 2-foot-tall retaining wall typically costs between $40 and $200 per linear foot. Costs vary based on material choice (vinyl vs. concrete block vs. natural stone) and whether the project is DIY or requires professional labor.
Can cinder blocks be used for retaining walls?
Standard CMU (cinder block) works for retaining walls but requires mortar and rebar reinforcement for taller applications. Purpose-built interlocking retaining wall blocks are easier for DIY projects and designed specifically for the lateral loads involved.
What are the most common mistakes when installing retaining wall blocks?
The most common errors are:
- Skipping or skimping on the compacted gravel base
- Omitting drainage gravel or a drain pipe behind the wall
- Failing to stagger block joints between courses
- Not maintaining consistent setback (batter) per course
Each one compromises structural integrity and shortens wall lifespan.