Introduction
A flagstone patio offers natural beauty and serious durability, but only when installed correctly. The irregular shapes, earthy tones, and slip-resistant texture deliver an aesthetic that manufactured pavers can't replicate. Installation is moderately challenging, requiring careful site prep, proper base construction, and precise stone placement to avoid costly long-term problems.
This guide covers everything you need before breaking ground: design ideas and stone types suited to Wisconsin's climate, realistic cost expectations for 2025–2026, and a complete step-by-step installation walkthrough. Whether you're a homeowner planning a DIY project or a contractor pricing a job, you'll learn what it takes to build a flagstone patio that lasts.
Skip the base prep or rush the gravel compaction, and you'll pay for it later. Stones rock underfoot. Joints fill with weeds. In cold climates like Milwaukee, frost heave cracks and shifts the surface, forcing expensive rework within a year or two.
TL;DR
- Flagstone patios cost $15–$32 per sq. ft. installed, more than concrete but with a 50+ year lifespan
- Two installation methods exist: dry-set (flexible, permeable, cold-climate friendly) and mortar-set (rigid, formal, prone to cracking in freeze-thaw regions)
- 4–6 inches of compacted gravel base is the only reliable defense against frost heave in Wisconsin
- Polymeric sand resists weeds and erosion better than regular masonry sand for joint filling
- Quartzite and bluestone handle Midwest winters well; softer sandstones need breathable sealers to prevent spalling
Flagstone Patio Ideas: Styles, Patterns, and Stone Types
Before buying stone, decide three things: your overall style (formal vs. informal), installation method (dry-set vs. mortar), and intended use (dining area, lounge, walkway). These choices determine which stone type and pattern work best.
Stone Types and Their Characteristics
Not all flagstone survives Wisconsin winters. Milwaukee's freeze-thaw cycles destroy porous stones from the inside out. Choose dense, low-porosity materials or commit to rigorous sealing.
Common flagstone types for patios:
- Quartzite: Mohs hardness 7, extremely dense (0.5–2% porosity). Resists scratching, chipping, and harsh climates. Golden-yellow tones. High cost, but it holds up where softer stones fail.
- Bluestone: Dense sandstone variant, Mohs 6–7, with classic blue-gray color. Excellent freeze-thaw resistance — the industry standard for cold climates.
- Sandstone: Mohs 6–7, but porosity varies widely. Warm tans, reds, and browns. Softer varieties prone to surface weathering and flaking in freeze-thaw conditions without sealing.
- Limestone: Mohs 3–4, softer calcite base. Dense varieties handle cold climates, but susceptible to acid rain and salt damage. Requires sealing.
- Slate: Mohs 2.5–4, absorbs water readily. Cool grays and blues. Requires sealing in freeze-thaw regions to prevent delamination.
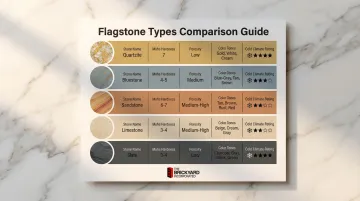
Color broadly splits into two camps: warm tones (sandstone's tans, reds, and browns; quartzite's golden-yellow) and cool tones (slate and bluestone's grays and blues). The Brickyard stocks both standard and specialty natural stone paving products across the Milwaukee area if you want to compare options in person before committing.
Once you've settled on a stone, the next decision is how you want to arrange it.
Patterns and Layout Styles
Formal pattern (cut flagstone):
- Rectangular or square shapes laid in repeating patterns (random rectangle, ashlar)
- Ideal for dining areas where furniture stability matters
- Works best mortared for smooth, even surface
- Cleaner, more contemporary look
Informal pattern (irregular/"crazy paving"):
- Natural, puzzle-piece shapes arranged organically with wider gaps
- Visually rustic and better suited for dry-set installation
- More forgiving for DIY projects
- Gaps can be filled with polymeric sand, pea gravel, or living ground cover
Gap and Joint Design Options
Your joint filler affects drainage, maintenance, and aesthetics. Four options are worth knowing:
Polymeric sand — Weed-resistant and erosion-resistant; binds under moisture and flexes through freeze-thaw cycles. Best for tight joints (1–2 inches). Requires activation with water.
Pea gravel — Permeable and casual-looking. Works in wider gaps, drains well, but needs occasional top-up as stone shifts.
Mortar — Smooth, formal finish, but only suitable for mortar-set installations over a concrete slab. Prone to cracking in freeze-thaw climates.
Living ground cover — Best for wide gaps (2+ inches) in low-traffic areas. Three reliable choices for Wisconsin conditions:
- Creeping thyme: full sun, handles moderate foot traffic, grows 2–6" tall, and releases fragrance when brushed
- Sedum/stonecrop: tolerates full to part sun, drought-resistant, reaches 4–8" tall
- Irish moss: prefers part shade and moisture, stays low at 1–2" — good for shaded patios with light use
How Much Does a Flagstone Patio Cost?
Expect to pay $15–$32 per square foot installed for flagstone, depending on stone type, installation method, and location. That's up to three times the cost of poured concrete — but you're getting a natural aesthetic and a 50+ year lifespan in return.
Cost Breakdown by Project Size
Standard 20x20 patio (400 sq. ft.):
- Professional installation: $6,000–$12,000 total
- DIY materials only: $1,800–$4,500
Milwaukee-area homeowners should factor in local labor rates (typically $9–$17 per square foot) and delivery costs for natural stone.
Those numbers shift considerably based on a handful of key variables. Here's what drives the final price up or down.
Factors That Affect Flagstone Patio Cost
Stone type and origin:
- Local stone costs less than imported varieties
- Quartzite and bluestone carry higher price tags
- Irregular flagstone material is often cheaper, but the labor to fit it costs more than installing uniform cut pieces
Stone thickness:
- Minimum 1.5 inches required for foot traffic and furniture
- 2-inch stone prevents cracking under load but increases material cost and handling difficulty
- Thicker stone weighs considerably more — bluestone runs ~167 lbs per cubic foot
Installation method:
- Dry-set is cheaper (materials and labor)
- Mortar-set requires pouring 4-inch reinforced concrete slab first, adding $5–$6 per square foot
Base preparation complexity:
- Deeper excavation in frost-prone areas increases labor
- Poor drainage requiring additional gravel or drainage pipe adds cost
- Sloped sites require more grading work
Patio size and shape:
- Irregular shapes require more cutting and waste
- Order 10–15% extra material to account for cuts and breakage
Flagstone vs. Pavers vs. Concrete: Cost Comparison
| Material | Cost per Sq. Ft. (Installed) | Key Characteristics |
|---|---|---|
| Flagstone | $15–$32 | Natural appearance, unique, permeable, highest cost |
| Concrete Pavers | $8–$25 | Uniform, easier DIY, moderate cost, colors may fade |
| Poured Concrete | $4–$15 | Lowest cost, impermeable, cracks over time, limited repair options |
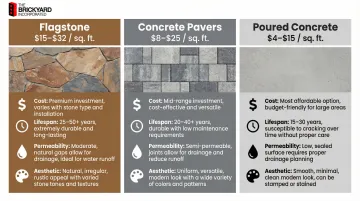
If the flagstone price point is a stretch, combining it with concrete pavers for borders or walkways is a practical way to manage budget without sacrificing the look.
DIY vs. Professional Installation Cost Difference
Professional installation includes:
- Skilled labor for puzzle-fitting irregular stones
- Equipment rental (plate compactor, stone saw)
- Site prep and grading
- Stone cutting and shaping
- Proper base compaction and leveling
DIY savings:
- Save $9–$17 per square foot in labor
- Requires physical strength (flagstone is extremely heavy)
- Takes 2–3 times longer than laying uniform pavers
- Realistic for dry-set installations under 300 sq. ft.
That said, some projects are genuinely beyond the realistic DIY range:
Leave to professionals:
- Mortar-set installations over concrete slab
- Patios adjacent to house foundations
- Projects over 300 sq. ft.
- Sites with complex drainage challenges
How to Install a Flagstone Patio: Step-by-Step
Installation follows a defined sequence: design and layout, excavation, base layer construction, stone placement, gap filling, and edging. Skip or rush any stage, and you'll pay to fix it later. Start with the prerequisites below before you pick up a shovel.
Prerequisites and Site Considerations
Confirm these conditions before breaking ground:
- Ground must be stable (no recent fill dirt)
- Area must drain away from the house (minimum 1.5–2% slope = 1/8" to 1/4" drop per foot)
- Mark all irrigation lines and underground utilities
Wisconsin-specific requirement:Milwaukee's frost line reaches 65 inches, with typical seasonal frost penetration of 15–21 inches. You don't need to excavate below the frost line for at-grade patios, but you must build a proper drainage base. A 4–6 inch compacted gravel base provides the necessary capillary break—a barrier that stops water from wicking up through the soil—to prevent ice lensing and frost heave.
Tools and Materials Required
Materials:
- Flagstone (calculate square footage + 10–15% overage)
- Crushed gravel (ASTM No. 57 or 3/4-inch minus), 4–6 inches deep
- Coarse sand or decomposed granite, 1 inch deep
- Landscape fabric (woven or non-woven geotextile)
- Polymeric sand or gap filler of choice
- Edging material (metal, brick, or stone)
Tools:
- Spade shovel and flat-edge shovel
- Plate compactor (rentable, minimum 5,000 lbf)
- Rubber mallet
- 4-foot level
- String line and stakes
- Tape measure
- Safety glasses and gloves
- Angle grinder or masonry saw (for cutting stone)
The Brickyard stocks flagstone, masonry sand, edging materials, and polymeric sand for both residential and contractor projects in the Milwaukee and Southeastern Wisconsin area.
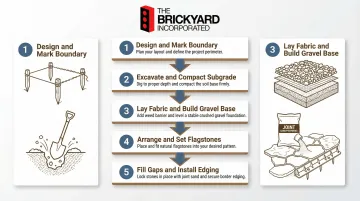
Step-by-Step Installation
Design and mark the patio boundary — Use stakes and string or a garden hose to outline the shape. Mark slope direction (away from house) and account for edging width in final dimensions.
Excavate to correct depth — Dig down 6–8 inches total (4–6" gravel + 1" sand + stone thickness). In Wisconsin, aim for 8 inches in areas with poor drainage. Remove all grass, roots, and debris, then compact the subgrade soil with a plate compactor to 98% standard Proctor density (firm, with no give underfoot).
Lay landscape fabric and build the base — Place geotextile fabric over the compacted subgrade to suppress weeds and prevent base migration. Add 4–6 inches of crushed gravel in 2-inch lifts, compacting each lift thoroughly. Top with a 1-inch layer of coarse sand (ASTM C33) or 1/4-inch clear stone as the setting bed, then screed level with a straight board.
Arrange and set the flagstones — Lay stones out in a dry run first to plan your puzzle arrangement. Rotate and flip stones to minimize cuts, leaving 1–2 inch gaps between pieces. Set each stone into the sand bed, tap firmly with a rubber mallet, and check level constantly—stones should not rock. Add or remove sand beneath individual stones to adjust.
Fill gaps and finish edges — Sweep polymeric sand into all gaps and mist lightly with water to activate the binding agent. Repeat until gaps are flush with the stone surface. Install edging around the perimeter to lock stones in place, then do a final level check and correct any rocking stones.
Post-Installation Checks
Before using the patio, run through these final checks:
- Walk the entire surface and press each stone—fix any that rock
- Verify slope direction drains away from the structure
- Confirm all gaps are filled flush to the top of the stones
- Allow polymeric sand to cure per manufacturer's instructions (typically 24 hours) before heavy use
- Test drainage by hosing down the patio and observing water flow
Common Flagstone Installation Problems and Fixes
Most flagstone problems stem from base preparation shortcuts or incorrect gap filling. Address them early to prevent expensive repairs.
Rocking or Uneven Stones
Problem: Individual stones shift or rock underfoot after installation.
Likely cause: Insufficient or inconsistent sand/setting bed depth, or stones placed on high spots without being fully seated.
Fix: Lift the affected stone, add or remove sand to create a uniform, flat setting bed, and re-set the stone using a mallet and level. Check surrounding stones to ensure they're properly bedded as well.

Weed Growth in Joints
Problem: Weeds push up through gaps between stones within the first season.
Likely cause: Regular masonry sand was used instead of polymeric sand, or landscape fabric was omitted beneath the base.
Fix:
- Remove existing weeds and roots
- Sweep out old joint sand completely
- Refill with polymeric sand
- Activate with water per product instructions to harden and inhibit weed growth
- Reapply as joints wear down over time
Frost Heave and Stone Movement in Cold Climates
Problem: Stones shift, crack, or become uneven after the first winter. In Southeastern Wisconsin, this is the most common cause of patio failure.
Cause: The gravel base was too shallow to prevent water from pooling and freezing, or it wasn't properly compacted. When freezing temperatures reach frost-susceptible soils (silts and clays) with access to water, the water expands into "ice lenses" that exert massive upward pressure — lifting and cracking the surface.
Fix: Severe cases require full base reconstruction. Remove the existing flagstone, excavate to proper depth, and recompact with a minimum of 4–6 inches of gravel before resetting stones. The gravel base must provide a capillary break and free drainage to prevent ice lensing from recurring.
Pro Tips for a Long-Lasting Flagstone Patio
Pro Tips for a Long-Lasting Flagstone Patio
Use Polymeric Sand, Not Regular Masonry Sand
Polymeric sand resists weed growth, binds under moisture, and flexes through freeze-thaw cycles — all of which matter in a Wisconsin winter. It also requires far less annual maintenance than standard masonry sand. Reapply when joints wear down, typically every 3–5 years.
Order 10–15% Extra Flagstone
Account for cuts, breakage, and irregular shapes. Running short mid-project is a real problem — trying to match stone from a different batch often results in noticeable color variation. Extra material also gives you a stockpile for future repairs.
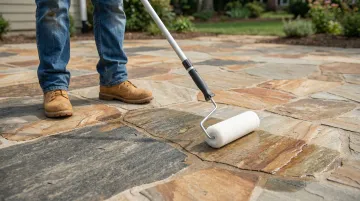
Apply a Penetrating Stone Sealer
Use breathable, penetrating impregnators (silane/siloxane chemistry) to protect against staining, moisture penetration, and surface weathering. Avoid topical film-forming sealers entirely; they trap moisture and cause spalling, especially in freeze-thaw conditions. Reapply every 3–5 years.
Know When to Hire a Professional
Some flagstone projects are well within DIY reach. Others aren't. Bring in a pro if your project involves:
- Mortar-set flagstone over a concrete slab
- Any patio adjacent to the house foundation
- Large-scale installations over 300 sq. ft.
- Sites with complex drainage challenges
- Extensive stone cutting
Compact in Lifts, Not All at Once
When building your gravel base, add and compact 2 inches at a time. Running a plate compactor over 6 inches of loose gravel in a single pass won't achieve proper density — the base will settle unevenly and cause problems for years.
Frequently Asked Questions
How much does a 20x20 flagstone patio cost?
A 400 sq. ft. flagstone patio costs $6,000–$12,000 professionally installed, or $1,800–$4,500 in materials for DIY. Costs vary based on stone type (quartzite costs more than sandstone), installation method (dry-set is cheaper than mortar-set), and whether you hire a professional or do it yourself.
Is flagstone more expensive than pavers?
Yes, flagstone typically costs $15–$32 per square foot installed vs. $8–$25 for concrete pavers. Natural irregular flagstone is typically the pricier option, though cut flagstone approaches paver pricing in some markets. The premium buys unique natural aesthetics and superior permeability.
Is a flagstone patio cheaper than concrete?
No. Poured concrete costs $4–$15 per square foot, making it one of the least expensive patio surfaces. Flagstone costs significantly more but offers permeability, natural aesthetics, and easier individual stone repair that poured concrete cannot match.
Is flagstone better than pavers?
Neither is universally better. Flagstone offers a more natural, unique appearance and excellent permeability, while manufactured pavers offer uniformity, easier DIY installation, and often lower cost. Your budget, style preference, and intended use will determine the right fit.
Is flagstone good for a patio?
Yes. Flagstone is an excellent patio material: durable, naturally slip-resistant, permeable, and visually distinctive. It can last 50+ years when properly installed. However, it requires careful installation (especially proper base preparation in cold climates) and periodic joint maintenance to perform well long-term.
What goes under flagstone?
A flagstone base typically consists of 4–6 inches of compacted crushed gravel—critical in Wisconsin's freeze-thaw climate to prevent frost heave—topped with 1 inch of coarse sand or decomposed granite, laid over compacted subgrade and landscape fabric. Total excavation depth is typically 6–8 inches.
![How Much Does a Concrete Driveway Cost? [2026 Data]](https://file-host.link/website/thebrickyardwi-ie8696/assets/blog-images/739cc277-5d64-4828-9270-a102416927f6/1773750851050546_501e13ada9cf4d2fae6b977ce0847b69/1080.webp)