Introduction
Professional pizza ovens reach 700–900°F, while most home ovens top out at 500–550°F. That's a real gap — but it's rarely why homemade pizza disappoints. The culprit is almost always the wrong setup, underprepared tools, and skipped steps that any pizzeria takes for granted.
The difference between pale, floppy pizza and crisp, blistered crust comes down to thermal mass, proper preheating, and controlling a handful of key variables. This guide walks through the right tools, how to build and hold thermal mass in a standard oven, and the specific mistakes — from cold stones to overloaded toppings — that consistently ruin results at home.
TL;DR
- Thermal mass (pizza stone, baking steel, or cast iron) is the most important upgrade
- Preheat for 45–60 minutes minimum at maximum temperature
- Use rack position and broiler together to simulate professional top-and-bottom heat
- Room-temperature dough and 24–72 hour cold fermentation sharply improve flavor and texture
- Avoid under-preheating and overloading toppings — the two most common mistakes
What You Need to Turn Your Home Oven Into a Pizza Oven
The right tools close the performance gap between a home oven and a dedicated pizza oven. Most options are affordable or already in your kitchen.
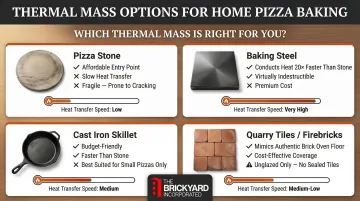
Thermal Mass Options
- Pizza stone: Affordable and widely available. Retains heat well but conducts it slowly. Fragile — thermal shock from rapid temperature changes can crack them, so heat gradually.
- Baking steel: Conducts heat approximately 20 times faster than ceramic, producing crispier crusts in less time. More durable than stone; typical thickness ranges from 0.25" to 0.375". Worth the higher cost for serious pizza makers.
- Inverted cast iron skillet: Budget-friendly and effective for smaller pizzas. Cast iron conducts heat faster than stone. Flip a 12" skillet upside down to create a flat cooking surface.
- **Unglazed quarry tiles or firebricks**: Arrange these on an oven rack to mimic radiant heat from a traditional brick oven floor. Available from masonry suppliers like The Brickyard. Never use glazed tiles or bricks with unknown coatings — they can release toxic fumes or leach heavy metals like lead when heated.
Supporting Tools
- Pizza peel (or substitute): Slides the pizza onto the hot surface without losing its shape. A thin bamboo cutting board or inverted sheet pan works in a pinch. Dust generously with semolina flour or cornmeal to prevent sticking.
- Oven thermometer: Home oven dials are often off by 25–50°F. A thermometer tells you the actual internal temperature so you're not guessing.
Dough Readiness
Quality dough makes or breaks your pizza. Two specs matter most:
- Bread flour (12.5–14.2% protein): Higher protein content builds better gluten structure for chew and strength.
- Cold ferment 24–72 hours: Refrigerator fermentation slows yeast activity while enzymes break down starches and proteins, front-loading the dough with Maillard reactants for superior browning at lower temperatures.
Same-day or store-bought dough can't compete with a properly fermented batch.
How to Turn Your Home Oven Into a Pizza Oven
Step 1: Position Your Thermal Mass
Place the pizza stone, baking steel, or cast iron on the second-from-top rack. This positions it close enough to the broiler element for intense top heat while still receiving radiant heat from below.
If using an inverted cast iron skillet, confirm it fits the rack depth and that the oven door closes fully before proceeding.
Step 2: Preheat Thoroughly
Set the oven to its maximum temperature (typically 500–550°F) and preheat for at least 45–60 minutes. Don't just wait until the oven beeps—that only measures air temperature.
America's Test Kitchen tested this with infrared readings: a pizza stone at 500°F reached only 291°F after 15 minutes, 415°F after 30 minutes, and 509°F after 60 minutes.
Thermal mass acts as a heat reservoir that transfers intense bottom heat to the dough on contact, triggering oven spring and crust blistering. Skip the full preheat and you'll get pale, undercooked crust no matter how long the pizza bakes.
Step 3: Prepare the Dough and Toppings
Remove dough from the refrigerator 1–2 hours before baking so it reaches room temperature. Cold dough is resistant, shrinks when stretched, and bakes unevenly.
Keep toppings light and dry. Excess moisture from overloaded or watery ingredients prevents the bottom crust from crisping and leads to a soggy center. Pat toppings dry with paper towels and pre-cook high-moisture vegetables like mushrooms or peppers.
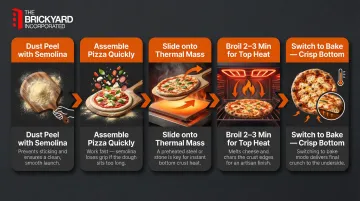
Step 4: Launch and Bake Using the Broiler Method
- Dust the peel generously with semolina or cornmeal
- Assemble the pizza quickly on the peel
- Slide it directly onto the preheated thermal mass
- Immediately switch the oven to broil for 2–3 minutes to blast the top with high heat
- Switch back to bake mode to finish crisping the bottom
Total bake time is typically 6–10 minutes depending on thermal mass type and oven. Watch closely—the broiler can char cheese quickly.
Key Variables That Affect Your Pizza Results
Four variables determine whether your home pizza turns out mediocre or genuinely good. Get these right and the constraints of a home oven matter a lot less.
Oven Temperature
Professional Neapolitan ovens bake at 806–905°F with floor temperatures of 716–806°F. Home ovens max out at 500–550°F. That's a deficit of roughly 300–400°F. Even a 50°F increase makes measurable differences in crust texture, blistering, and how fast the pizza finishes. The Maillard reaction accelerates above 280°F, and a 36–50°F temperature increase can increase crust thickness by up to 31%.
Thermal Mass Material and Thickness
Steel conducts heat roughly 20 times faster than stone, producing faster crust browning and crispier texture. A 0.375" baking steel, for example, takes longer to preheat than a 0.25" version — but it holds more heat and recovers faster when you slide a cold pizza on top.
Dough Hydration and Fermentation Time
Higher hydration doughs (65–70% water-to-flour ratio) produce an open, airy crumb with larger bubbles. Longer cold fermentation develops complex flavor and improves browning. Underdeveloped dough, by contrast, bakes up flat and dense with little flavor. For reference:
- Neapolitan: 60–62.5% hydration
- New York Style: 63–67% hydration
- Artisan/Pan Pizza: 70%+ hydration
Rack Position and Heat Balance
Too low and the bottom burns before the top cooks. Too high and the cheese bubbles before the crust sets. The second-from-top rack in broiler mode hits the sweet spot for balanced heat exposure, mimicking the top-and-bottom heat of a professional oven.
Common Mistakes When Baking Pizza in a Home Oven
Most home pizza problems trace back to three fixable mistakes:
- Not preheating long enough: A stone or steel that hasn't heat-soaked for 45–60 minutes will leave the bottom pale and underdone, no matter how long the pizza bakes. Surface heat reads hot on a thermometer but doesn't carry enough stored energy to actually crisp a crust.
- Too many toppings: Excess moisture from heavy sauce, wet vegetables, or too much cheese traps steam against the crust instead of letting it escape. Use less than you think you need.
- Cold or under-fermented dough: Dough straight from the fridge—or dough that hasn't had enough time to ferment—produces rubbery texture, weak flavor, and shrinkage when you try to stretch it. Aim for at least a 24-hour cold ferment, or let refrigerated dough rest at room temperature for 1–2 hours before use.
Alternatives: When to Go Beyond the Home Oven
A properly set-up home oven gets most people to 80–90% of professional pizza quality. For those who want to close that remaining gap, two upgrade paths are worth knowing.
Countertop Outdoor Pizza Ovens
Models like Ooni and Roccbox reach 950°F in 15–20 minutes, producing authentic Neapolitan-style char in 60–90 seconds. They're the right fit for pizza enthusiasts who bake regularly and want near-professional results without a permanent build.
Key trade-offs to consider:
- Cost: Most quality models run $349–$699
- Location: The majority are designed for outdoor use only
- Setup: No installation required — plug in, preheat, bake
Built-In Outdoor Wood-Fired Pizza Oven
Wood-fired ovens deliver the highest heat and the most authentic flavor — the result of live fire and radiant heat that no electric appliance fully replicates. For homeowners interested in a DIY build, The Brickyard in Milwaukee carries the firebrick and refractory materials needed to construct one, the same heat-resistant components used in professional ovens. These projects pair naturally with outdoor kitchen and patio setups.
Expect material costs of $1,800–$2,500+ for a DIY build, not including labor.
Frequently Asked Questions
What temperature should a home oven be set to for pizza?
Set your oven to its maximum temperature—typically 500–550°F. Higher heat produces a crispier, well-blistered crust in less time.
How long should I preheat a pizza stone or baking steel?
Preheat for at least 45–60 minutes. Waiting only until the oven beeps is not enough — the stone or steel needs additional time to absorb and retain that heat before it can properly cook your crust.
Can I use regular bricks or tiles instead of a pizza stone?
Unglazed quarry tiles or firebricks work effectively as thermal mass. However, never use glazed tiles, painted bricks, or bricks with unknown coatings—they can release toxic fumes or leach heavy metals when heated to 500°F+.
What is the difference between a pizza stone and a baking steel?
Steel conducts heat much faster than stone (approximately 20 times faster), producing crispier crusts more quickly. Stone is more affordable but more fragile and slower to transfer heat to the dough.
Why is my homemade pizza crust coming out soggy?
Three most common causes: under-preheated thermal mass, too many wet toppings, and dough that is too thick or underfermented. Start with the thermal mass — it's the fix that makes the biggest difference.
Do I need a pizza peel to bake pizza in a home oven?
A peel is ideal but not mandatory. A thin wooden cutting board or an inverted sheet pan dusted with semolina works as a substitute for launching small pizzas onto a hot surface.